A brief introduction
HideVolumeOSD did not work with Windows 11 till now, so I decided to change that and added some extra functionality, which some users have requested. You should have version to run this, I have not tested earlier versions. And it will of course run on Windows 10.
There was a bug when being started at a volume of 100%, the value was always reduced to 98%. This has been fixed. The “OSD Window not found” message has been replaced by a Windows notification.
And it is now possible to show a numeric ToolTip near the icon (or the clock) with the current volume value. Size and display time can be configured.
The Details
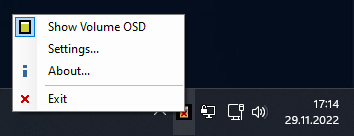
At first view everything is like before, a soon as HideVolumeOSD runs, it hides the Volume bar. But when you open the context menu on the tray icon, you will notice that the menu has a new entry for Settings.
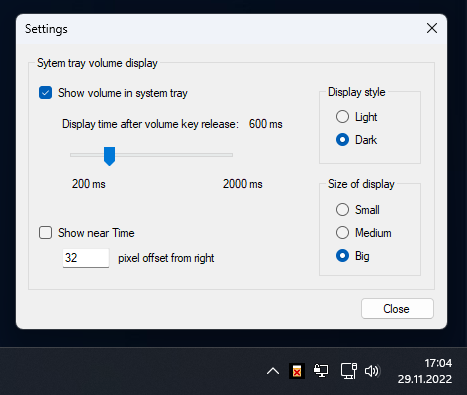
When you select the Settings… entry in the menu the following dialog will appear…
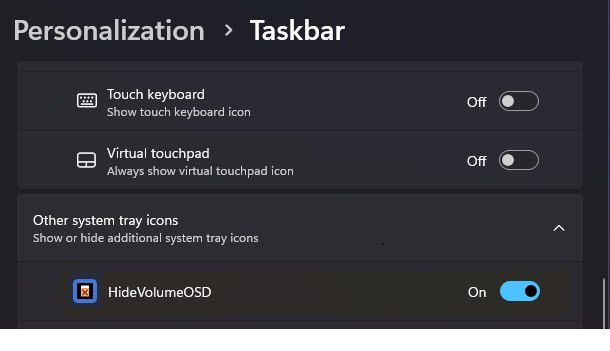
Some users have requested to show the volume in the system tray near the HideVolumeOSD icon. This is exacly what the feature “Show volume in system tray” does. Additionally you can choose the time the volume will stay visible when you release the volume buttons on the keyboard. Before you turn “Show volume in system tray” on, you must go to Personalization/Taskbar and turn the visibility of HideVolumeOSD to “On”.
If you now press one of the volume buttons you will see the volume over the HideVolumeOSD icon. With “Size of display” you can choose the desired size. Here is how the 3 different sizes look like:
You can also check “Show near Time” to show the volume popup at the right corner of the screen with a selectable offset from the right screen border.

This version should run on all versions of Windows 8 / 8.1 / 10 and 11.
Please uninstall any previous HideVolumeOSD version before you install this one!
When executing the setup you will get a Windows SmartScreen warning. This is caused by the fact that I have no commercial certificate to sign the application/setup, because it’s for free. To bypass this, just click on “More Info” at the SmartScreen warning and then on “Run anyway” to install.
Everyhing else about this application is described here


